How to create a Minecraft Cross Platform server using the Geyser and Floodgate plugin for both Bedrock and Java players to play together.
Requirements For a Cross Platform Minecraft Server
It hasn’t got many requirements, just be aware that it will need to be launched on a Minecraft server first for Bedrock clients to be able to join. As Bedrock servers don’t support plugins it cant be done the other way around. This means that bedrock players will be playing with Java mechanics such as the combat.
If you want to install it on a previous version to 1.17 you can check out our video guide here. It is a very similar video apart form the config settings look slightly different and it uses an older jar file.
How to Prepare Your Server For the Plugins
I always suggest clearing your server completely before installing another jar. If you are already on 1.17 and just need to add the plugins then skip to this step.
To do this first Stop your server. Once completely stopped then head to your FTP file access or load up your server on FileZilla. At this point take a copy or create a backup of your world if you want to keep it for another time.
Now select all the server files and delete them. Don’t worry once you load up a fresh server jar it will load up all the correct files too. The reason I prefer to delete them manually is because the setup function to delete all server files is good. But from my previous experience with the Multicraft panel can be un predictable with deleting all the folders.
Now that you have a fresh server, go back to your main multicraft dashboard and change the server jar to Spigot 1.17. Ill be using spigot as currently it has been updated to 1.17 and paper hasn’t yet. Once paper 1.17 is out then I would also use this method in exactly the same way as Paper supports both Spigot and Bukkit plugins.
Save your settings and start the server back up. Once its started then go ahead and stop it again. As this has now loaded up all our server folders including our new plugin folder to insert the Geyser and Floodgate plugins.
How to Download Geyser and Floodgate For a Cross Platform Server
You can download both files from the GeyserMC website. The geyser plugin is the easiest to find but the floodgate plugin is usually found by following a few links.
From the main page just go to download on the top of the page and it will take you through to the main Geyser download page. From here select the Geyser-Spigot.jar and download it. Save this in a folder that you can easily access again for uploading it later.
After that you will need to find the Floodgate file. Don’t go through the button on the main dashboard saying floodgate. It is much easier following of from the Geyser download page. On the top left you will see you have the options of Dashboard > GeyserMC > Geyser > Master.
Select GeyserMC, followed by the floodgate option.

After that select the master option to take you to the main Floodgate plugin download page.

From here you can download the floodgate-spigot.jar file. You now have both plugins downloaded and ready to install to your Minecraft server.
Your only a few steps away from creating your own cross platform server to play on with your friends on windows 10, mobile and other consoles providing they are able to connect to servers.
How to Install Geyser and Floodgate to Your Minecraft Server
With your server stopped, we will be using FileZilla to upload the plugins because the files are a bit bigger since the 1.17 update. Online ftp file access on Multicraft wont allow uploads of certain sizes.
Once you have logged in using your FTP information you can simply drag and drop the plugin into the plugins folder on your server.
Alternatively open the plugins folder on your server (the right hand side) and then drag each plugin from your pc (the left hand side) to your server on the right on the page. Now you can close FileZilla and go back to your Multicraft dashboard, then start your server back up.
Once your server has started you will need to stop it one more time as we need to change some configuration settings.
How to Configure Your Geyser Config File (Important)
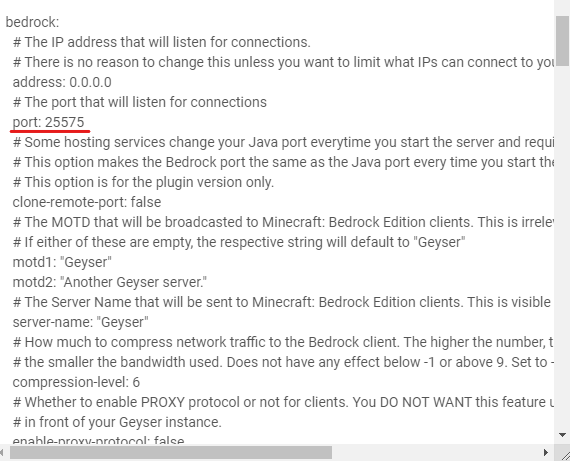
Now if you go to your Files from the main dashboard and the Config Files. You will notice there are some more files. The one you need is called geyser.yml

Now once your open this file to edit your will need to fill it in with your server IP and port.
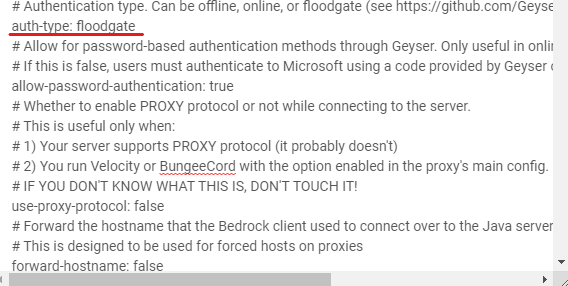
Use the pictures below to guide you through changing over the information. I have highlighted the areas you need to change your IP and port too.
First start off by changing the port in this section to the one you are using on your server.
Next up you will need to copy and paste your ip address (for your server) into the field saying “auto”
Then underneath fill in the port provided with the one matching your server.
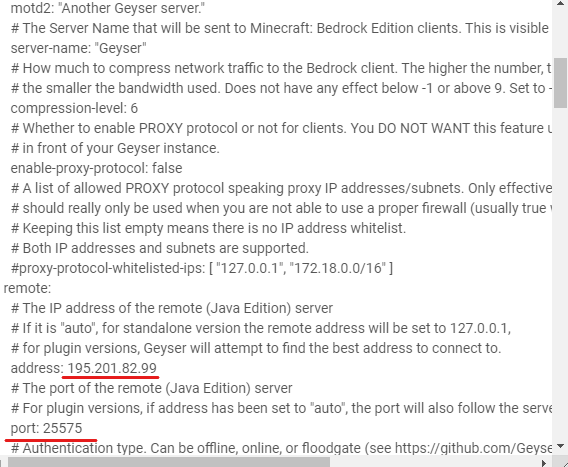
Finally change the auth-type to say floogate. Once you have done that save your settings and return to your main dashboard and start your server again.
Thats it! Your done. Just remember that bedrock clients will need your IP address and also your port.
Conclusion
With a few free plugins and about 10-15 minutes of spare time you can now play with both Java and Bedrock players on your server. Geyser constantly updates its plugin so make sure to check back often and report bugs to their discord page. Although at the time of writing this article there aren’t a lot of plugins updated to 1.17. From previous experience the geyser plugin works really well for Minecraft minigame plugins for both versions also. On 1.16.5 we have tested this one many Minecraft minigame plugins such as. Hide and Seek, Villager Survival, Skywars, Bedwars, Paintball and many other minigame plugins for Minecraft servers.